Showing posts with label eyeshadow. Show all posts

Speak Now Taylors Version Inspired Makeup Tutorial!

Speak Now Taylors Version Inspired Makeup Tutorial!


Hi! I decided to redo my Speak Now Taylors Version Inspired Makeup Tutorial! I didn't have a pastel purple when I did it initially. I wanted to do a softer look that would be a more "wearable" look for people who don't like as bold of looks, but still wanted to do a brighter look! I used 3 shades of purple and used my cheek highlight on the brow bone!


Here's The Video:


My go-to base:
Primer: Elf Cosmetics Power Grip, + 4% Niacinamide 
Foundation: ColourPop No Filter Foundation [fair 05] 
Concealer: Too Faced Born This Way Super Coverage Concealer [Cloud]
Powder: Coty Air Spun [Translucent]
Bronzer: Revolution X Fortnite Face Palette
Blush: Blush: ColourPop Lizzie McGuire Collection [You Are Magnifico]
Blush Topper: Revolution X Fortnite Face Palette
Highlight: Revolution X Fortnite Face Palette
Setting Spray: Urban Decay All Nighter Ultra Matte Setting Spray
Lipstick: Trestique Matte Lip Crayon; Florence Fig & Nantucket Nude


Eyes:
Primer: Too Faced Born This Way Super Coverage Concealer [Cloud]
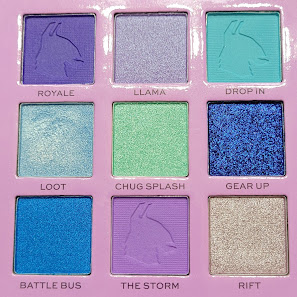
Palette: Makeup Revolution X Fortnite Supply Llama Palette
     - The Storm 
     - Royale 
     -  Llama 
Eyeliner: Trestique Eyeliner; Santorini Black Sand
Mascara: Elf Cosmetics Lash N' Roll, Black
Brow Pencil: Billion Dollar Brows, Brows On Point: Micro Brow Pencil; Taupe
Brow Gel: Saint Luxe [Clear]

Makeup Revolution x Fortnite; Llama Collection

Makeup Revolution x Fortnite Collection

Makeup Revolution x Fortnite; Llama Collection

Makeup Revolution and Fortnite dropped a collaboration! I used the Supply Llama palette, mascara and lip gloss. I used a few other pieces from the collection. There's just something about Purple and Teal together that I love! If you enjoyed don't forget to Subscribe to my YouTube channel! 
xoxo Lulu


Makeup Revolution x Fortnite CollectionMakeup Revolution x Fortnite Collection


My go-to base:
Primer: Revolution X Fortnite Supply Llama Dewy Swirl Primer
Foundation: ColourPop No Filter Foundation [fair 05]
Concealer: Too Faced Born This Way Super Coverage Concealer; Cloud
& ColourPop No Filter Concealer; Light 10
Powder: Revolution X Fortnite Peely Banana Light Baking Powder
Bronzer: Revolution X Fortnite Face Palette
Blush: Revolution X Fortnite Face Palette
Highlight: Revolution X Fortnite Face Palette
Setting Spray: Revolution X Fortnite Peely Fixing Spray
Lip Gloss: Revolution X Fortnite Llama Lip Swirl

Tools used from the Collection:
Revolution X Fortnite Trio Sponge Set

Eyes:
Eyeshadow Primer:
Pretty Vulgar Uncaged Eyeshadow Primer
Palette: Revolution X Fortnite Supply Llama 9 Pan Shadow Palette
     - The Storm 
     - Royale 
     - Loot
     - Rift
Eyeshadow Primer: NYX Glitter Primer
Eyeliner: Trestique Eyeliner; Santorini Black Sand
Liner: Revolution X Fortnite Water Activated Liner Palette
Mascara: Revolution X Fortnite Supply Llama Lash Mascara
Brow Pencil: Billion Dollar Brows, Brows On Point: Micro Brow Pencil; Taupe
Brow Gel: ColourPop Brow Boss Gel; Clear

Makeup Revolution x Fortnite; Cuddle Team Leader Collection

Makeup Revolution x Fortnite Collection

Makeup Revolution x

Fortnite Beauty Collection

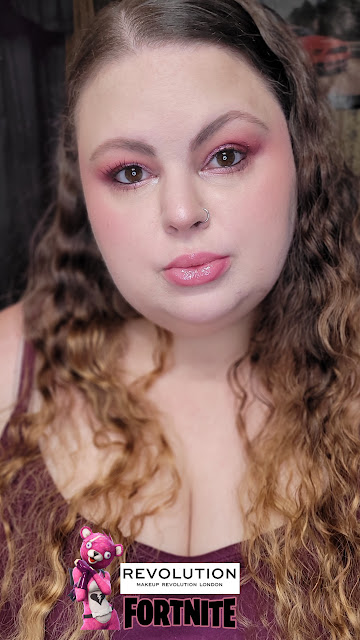
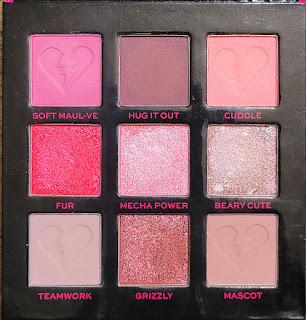
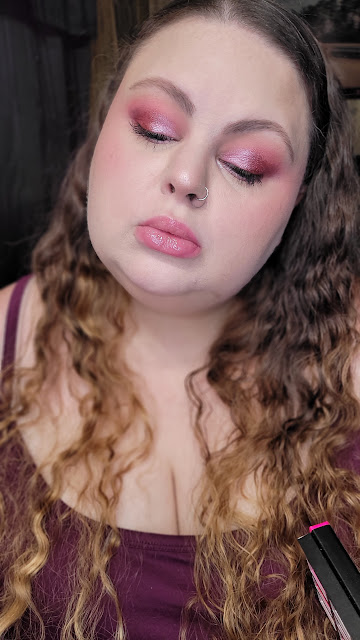
Makeup Revolution and Fortnite dropped a collaboration! Today I used the Cuddle Team Leader, pink items and did a look! I can't wait to create more looks and play in all of the other products!!! Thank you to my boyfriend for surprising me with this collection, I appreciate him so much! The quality on everything so far are amazing! Spoiler, I'm obsessed with the Bronzer / Highlight / Blush palette...
xoxo Lulu

I have videos on my YouTube of all three eyeshadow palette looks!


Makeup Revolution x Fortnite Collection
My go-to base:
Primer:
Revolution X Fortnite Supply Llama Dewy Swirl Primer
Foundation: ColourPop No Filter Foundation [fair 05]
Concealer: Too Faced Born This Way Super Coverage Concealer; Cloud
& ColourPop No Filter Concealer; Light 10
Powder: Revolution X Fortnite Peely Banana Light Baking Powder
Bronzer: Revolution X Fortnite Face Palette
Blush: Revolution X Fortnite Face Palette
Highlight: Revolution X Fortnite Face Palette
Setting Spray: Revolution X Fortnite Peely Fixing Spray
Lip Gloss: Revolution X Fortnite Cuddle Team Leader Pink Shimmer Lip

Tools used from the Collection:
Revolution X Fortnite Character Trio Brush Set
Revolution X Fortnite Trio Sponge Set

Makeup Revolution x Fortnite Collection
Eyes:
Eyeshadow Primer:
Pretty Vulgar Uncaged Eyeshadow Primer
Palette: Revolution X Fortnite Cuddle Team Leader 9 Pan Shadow Palette
- Cuddle
- Soft Maul-ve
- Hug It Out
- Mecha Power
- Grizzly
- Mascot
Eyeshadow Primer: NYX Glitter Primer
Eyeliner: Trestique Eyeliner; Santorini Black Sand
Mascara: Revolution X Fortnite Cuddle Team Leader Cuddle Lash Mascara
Brow Pencil: Billion Dollar Brows, Brows On Point: Micro Brow Pencil; Taupe
Brow Gel: ColourPop Brow Boss Gel; Clear


Morphe x Jaclyn Hill Dark Magic Eyeshadow Palette tutorial

Morphe x Jaclyn Hill Dark Magic Eyeshadow Palette
 Dark Magic Eyeshadow Palette Tutorial


Hello everyone! Today I have a simple makeup tutorial for you using the Morphe x Jaclyn Hill Dark Magic Eyeshadow Palette! I don't believe this palette is still for sale, but you can get this look using similar eyeshadow shades! I did the whole look with 5 eyeshadows from the palette. With it being a more neutral look, I was able to work in a pop of green and keep it on the more natural side! I have a YouTube short of the eyeshadow and a video of the full makeup look uploaded for you to check out and watch the process. 

Thank you so much for stopping by! I appreciate you!
Xoxo, Lulu


Follow me everywhere;

Here's the Short:

Full Video: 


My go-to base:
Foundation: Becca Ultimate Coverage 24-hour Foundation; Linen [Discontinued brand]
Concealer: Too Faced Born This Way Super Coverage Concealer; Cloud
& ColourPop No Filter Concealer; Light 10
Powder: Beauty Bakerie Face Flour Baking Powder; Oat / Translucent
Bronzer: Hanalei Matte Bronzer
Blush: ColourPop Lizzie McGuire Collection; You Are Magnifico
Highlight: Revlon SkinLights Prismatic Highlighter; Daybreak Glimmer
Setting Spray: Urban Decay All Nighter Ultra Matte Setting Spray
Lipstick: Trestique Matte Lip Crayon; Florence Fig

Eye Look:
Primer: Pretty Vulgar 
Palette: Morphe x Jaclyn Hill Dark Magic Palette;
     - Shhh (A medium warm brown shade)
     - Poof (A cream tone shade)
     - Mojo (A dark chocolate brown shade)
     - Power Cut (A metallic silver / light brown shade)
     - Trickery (A metallic dark green shade)
Eyeliner: Trestique Eyeliner; Santorini Black Sand
Mascara: L'Oreal Lash Paradise Waterproof Mascara; Black
Brow Pencil: Billion Dollar Brows, Brows On Point: Micro Brow Pencil; Taupe
Brow Gel: ColourPop Brow Boss Gel; Clear

My Effortless Makeup Look!


When I have to run errands and I don't want to do a full face of makeup, this is my "go-to" look. I still use a fair amount of products, but it is a more natural everyday kind of look. It's for those days when I don't have the time or energy to "Beat my face to the gods". There are a few different eye looks I'll do, but this is my usual look. I hope you enjoy!


First things first, I always wash my face with a charcoal face wash and a normal wash cloth. I've noticed if I don't wash my face just before I do my makeup, it doesn’t sit right. I often have breakouts and dry skin around my nose and chin, so washing and rinsing my face well is always a must! The face wash I use is Biore Deep Pore Charcoal Cleanser, it's has a cooling feeling and does seem to work. It’s honestly really thick and has little black flecks of charcoal in it. If I leave it on for more than a minute or two, my face starts to tingle and feel warm. So I just wash it off and move on to my moisturizer. I have been using the Nicel Daily Repair with Vitamin A and Retinol for about three years. I always got it at Big Lots for less than two dollars, but I have not been able to find it the last few times I had been there. I have seen it on Amazon though! Before I start my makeup, I throw on my chap stick in the flavor Pumpkin Pie.


Now on to the actual makeup! I always do eyes first. No matter what I do, I always have fall out. I start by priming my eyes with the hard candy primer and I put down a matte creamy nude color all over by wet n wild in Brulee. It helps make the rest of the shadows blend better and even everything out. I use the Wet N Wild Pallet in Comfort zone. It has super soft, pigmented shadows. I take the warm pinky brown shade on my lids then put the warm brown / blue shifty one in the crease. It’s comparable to Mac’s Blue Brown pigment.


After that, I clean up the fall out and move on to primer and foundation. I mix one pump of my green redness relief elf primer in with two pumps of my covergirl foundation in shade 810. Mixing them like that seems to make my foundation stay on longer than normal. When I’m in a rush, and want my foundation to look natural, I blend it in with my hands. The coverage is still nice and looks so much more natural than if I use a sponge. If needed, I’ll add some extra foundation to any spots and my under eyes with my real techniques miracle complexion sponge. I do have pretty dark circles. After, I set everything with my coty Air spun loose face powder. I love how it smells, it reminds me of my grandma. I always add a Bronzer to the "classic 3" area, if I don’t I look washed out. I like to bronze up with the Wet N Wild Coloricon Contouring Pallet. It also has a matte highlight shade, which I sometimes use under my eyes if I need more brightening. My favorite Blush is my Avon blush in Classic aura. It’s a gentle mauve, and looks really flattering on my skin tone. For highlight, I use the one I made myself. I highlight my cheek bones and above my brow, the tip of my nose and my cupids bow.


Last thing I do is finish my eyes, lips and set everything. I put on Rimmel Scandleyes waterproof "sparkling black" eye liner. I put it in my water line and tight line. Then I use my holy grail Maybelline the rocket mascara in waterproof on my top and bottom lashes. I put on like one and a half coats. focusing on my top lashes. I lightly fill my brows and brush them out in with the Jordana Fabubrow eyebrow pencil in dark brown. Personally, it’s too warm for me, and I’m looking into getting a more ashy one. If you have any suggestions, let me know down below. I use my Elf Mist & Set to keep everything in place and while its drying, I put on some gloss. My favorite is Maybelline The Elixir Colorsensational in shade 90, Rose Redefined. It's one of those glosses that is super shiny and long lasting, but not sticky. It has a grandma smell I love!

Then I’m done! It usually takes me about fifteen to twenty minutes to do it all and feel a lot more confident going out and about. I do have a lot of acne, acne scars and redness on my cheeks that bother me. If I’m having a decent skin day I’ll just wear mascara, eye liner, fill my brows in lightly and wear some chap stick and call it a day. I’m going to have some photos of the products and me throughout the steps! I hope you’ve enjoyed this post and if you want me to do anymore like this with different looks, let me know down below!

Thank you all for reading!
Xoxo Lulu.


How to make your own pressed powders!


Hi guys! Okay, so today I wanted to share with you how I make custom color eye shadows, highlighters, and well anything powder based! It’s the simplest way to do it and probably the least messy! I promise if you like makeup, you’ll have as much fun as I do making these! Always remember to leave them for at least twenty four hours!

This is what you will need:
Your chosen powders.
Rubbing alcohol, 90% +.
Clean containers for mixing. Glass is best.
Q tips and cotton rounds for cleaning things up.
A new or sanitary Orange stick or a foundation spatula.
An empty compact, metal pan, or cleaned palette.
A clean spoon to help break up the powder.
Something to press the powder with.
Paper towels, tissues or toilet paper.


When it comes to picking the eye shadow or powder your wanting to make, take into consideration if you want matte, frosty or glittery. For well, obvious reasons… You wont want shimmer or glitter in your matte shadow, lol. If you want to make both matte and a shimmery shadow, make the matte ones first if you only have one orange stick. As to not have shimmer in the matte shadow. You want to get everything out and set up on a clean dry table or desk. Wherever you feel like doing it really.

Step one! Pick your colors and start breaking them up carefully with the orange stick and put them into the container you’ll be mixing them in. Once you have all of your colors chosen and in the container, continue breaking the powder up so that it’s really fine and mixed up. You can test the color by swatching  it, adjust the color how you see fit!

Step two! Adding the rubbing alcohol. You want to start with adding a few drops and mixing it in. You need to add enough alcohol to form a thicker paste consistency, you don’t want it so thick that it’s still crumbly yet thin enough to be able to put in the pan you’ll be setting it in.

Step Three! Pouring and pressing your powders. Make sure before hand that you clean and wash the pans, palettes or compacts your going to use with some warm soapy water. Dry out everything and give it a wipe down with rubbing alcohol and a cotton round to ensure everything is sanitary. Once you’re ready to put the product in the pan, make sure you do a little at a time, using the orange stick to push the product in the corners.

Step Four! Pressing your powders! Find an object that fits the shape of the pan. Sanitize it and make sure it’s dry. Take a paper towel, tissue or toilet paper square (they’re literally all the same thing, just different thicknesses and textures). Put the paper towel and put it over the bottom of what you’ll be using to press it. Make sure there aren’t any folds on the bottom of it, you probably wouldn’t want that to show on the top of your powders. Press gently and evenly over the surface to help soak up some of the excess alcohol.

Step Five! Now that everything is done, let your needs product sit in a dry clean area for twenty four hours to dry out! Then your product is not ready to use!

I hope this was helpful and I hope you enjoyed this post. If you
did enjoy it please share with your friends make sure to leave a comment. Thank you so much for reading.

Xoxo, Lulu.


Popular Posts